Wordpress 的頁面不會時常更新,希望透過緩存的方式減少不必要的損耗,並同時加速頁面載入速度
雖然 Wordpress 有眾多的緩存插件可以使用,但用起來的效果感覺都沒有很好,所以決定用 Nginx 來實現緩存
環境
- Ubuntu - 20.04 LTS
- Nginx - 1.18.0 (Ubuntu)
- nginx-cache-purge - 0.1.8
- Lua - 5.2.4
實現 Nginx 緩存
一個最基本的 Wordpress 的反向代理設定
 1
 2
 3
 4
 5
 6
 7
 8
 9
10
11
|
http {
    server {
        listen 80;
        server_name domain.com;

        location / {
            proxy_hide_header X-Frame-Options;
            proxy_pass http://192.168.0.100;
        }
    }
}
|
設定緩存路徑及緩存鍵名
proxy_cache_path <path> [levels=levels] keys_zone=name:size [inactive=time] [max_size=size] [use_temp_path=on|off];
<path>: 設定代理緩存位置的相關設定為 /var/run/proxy_cache
levels: 設定目錄結構,例如 1:2,總共用了兩層目錄,第一層目錄單個 16 進制命名,第二層為兩個 16 進制命名
keys_zone: 設定緩存區的名稱和大小
inactive: 緩存保存的時間, 時間過後則刪除
max_size: 緩存最多使用多少空間
use_temp_path: 先寫入暫存緩存區,然後再寫入緩存區,預設為 on
proxy_cache_key <key name>
這裡 proxy_cache_key 使用 Nginx 變數 $scheme、$host、$request_uri
$scheme: Web 請求協議, http 或 https
$host: 請求伺服器的名稱,這邊基本上為域名
$request_uri: 請求網頁路徑
 1
 2
 3
 4
 5
 6
 7
 8
 9
10
11
12
13
|
http {
    proxy_cache_path /var/run/proxy_cache levels=1:2 keys_zone=WORDPRESS-PROXY:10m max_size=1000m inactive=600m use_temp_path=off;
    proxy_cache_key $scheme$host$request_uri;
    server {
        listen 80;
        server_name domain.com;

        location / {
            proxy_hide_header X-Frame-Options;
            proxy_pass http://192.168.0.100;
        }
    }
}
|
使用緩存
proxy_cache 使用設定的緩存區 WORDPRESS-PROXY
proxy_cache_valid 如果 Http 狀態為 200,則緩存為 1 天
 1
 2
 3
 4
 5
 6
 7
 8
 9
10
11
12
13
14
15
16
|
http {
    proxy_cache_path /var/run/proxy_cache levels=1:2 keys_zone=WORDPRESS-PROXY:10m max_size=1000m inactive=600m use_temp_path=off;
    proxy_cache_key $scheme$host$request_uri;
    server {
        listen 80;
        server_name domain.com;

        proxy_cache WORDPRESS-PROXY
        proxy_cache_valid 200 1d;

        location / {
            proxy_hide_header X-Frame-Options;
            proxy_pass http://192.168.0.100;
        }
    }
}
|
不用緩存
 1
 2
 3
 4
 5
 6
 7
 8
 9
10
11
12
13
14
15
16
17
18
19
20
21
22
23
24
25
26
27
28
29
30
31
32
33
34
35
36
37
|
http {
    proxy_cache_path /var/run/proxy_cache levels=1:2 keys_zone=WORDPRESS-PROXY:10m max_size=1000m inactive=600m use_temp_path=off;
    proxy_cache_key $scheme$host$request_uri;
    server {
        listen 80;
        server_name domain.com;

        proxy_cache WORDPRESS-PROXY
        proxy_cache_valid 200 1d;

        set $skip_cache 0;

        if ($request_method = POST) {
            set $skip_cache 1;
        }

        if ($query_string != "") {
            set $skip_cache 1;
        }

        if ($request_uri ~* "/wp-admin/|/xmlrpc.php|wp-.*.php|^/feed/*|/tag/.*/feed/*|index.php|/.*sitemap.*\.(xml|xsl)") {
            set $skip_cache 1;
        }

        if ($http_cookie ~* "comment_author|wordpress_[a-f0-9]+wp-postpass|wordpress_no_cache|wordpress_logged_in") {
            set $skip_cache 1;
        }

        location / {
            proxy_cache_bypass $skip_cache;
            proxy_no_cache $skip_cache;

            proxy_hide_header X-Frame-Options;
            proxy_pass http://192.168.0.100;
        }
    }
}
|
清除緩存
要清除 Nginx 的緩存可以使用 proxy_cache_purge ,但需要付費
所以這邊只能使用指令的方式來清除緩存,在 Nginx 中呼叫系統指令需要 lua
Install lua
- 安裝 lua 及相關套件
1
|
$ apt-get install lua5.2 lua5.2-doc liblua5.2-dev
|
- 安裝 luajit,提高 lua 的效能,存入記憶體中
1
|
$ apt-get install luajit
|
- 安裝 Nginx Lua Module,讓 Nginx 可以使用 Lua
1
|
$ apt-get install libnginx-mod-http-lua
|
- 安裝 nginx-cache-purge
1
|
$ (curl -s https://api.github.com/repos/magiclen/nginx-cache-purge/releases/latest | sed -r -n 's/.*"browser_download_url": *"(.*\/nginx-cache-purge_'$(uname -m)')".*/\1/p' | wget -i -) && sudo mv nginx-cache-purge_$(uname -m) /usr/local/bin/nginx-cache-purge && sudo chmod +x /usr/local/bin/nginx-cache-purge
|
設定清除入口
Wordpress 在更新文章、新增文章等等情況,總不能一直使用緩存頁面,否則看不到新的內容,除非緩存過期
所以需要有一個入口讓 Wordpress 可以進行呼叫,使其刪除需要刪除的緩存頁面
緩存入口為 /pruge/,並透過 lua 呼叫 nginx-cache-purge 進行刪除,成功回應 200,失敗則回應 400
其中 $my_cache_key 為 $scheme$host,而上面的 proxy_cache_key 是 $scheme$host$request_uri 為什麼少了 $request_uri
因為 $request_uri 多了 /purge/ ,所以使用 string.sub 刪除多出來的 /purge/
 1
 2
 3
 4
 5
 6
 7
 8
 9
10
11
12
13
14
15
16
17
18
19
20
21
22
23
24
25
26
27
28
29
30
31
32
33
34
35
36
37
38
39
40
41
42
43
44
45
46
47
48
49
50
|
http {
    proxy_cache_path /var/run/proxy_cache levels=1:2 keys_zone=WORDPRESS-PROXY:10m max_size=1000m inactive=600m use_temp_path=off;
    proxy_cache_key $scheme$host$request_uri;
    server {
        listen 80;
        server_name domain.com;

        proxy_cache WORDPRESS-PROXY
        proxy_cache_valid 200 1d;

        set $skip_cache 0;

        if ($request_method = POST) {
            set $skip_cache 1;
        }

        if ($query_string != "") {
            set $skip_cache 1;
        }

        if ($request_uri ~* "/wp-admin/|/xmlrpc.php|wp-.*.php|^/feed/*|/tag/.*/feed/*|index.php|/.*sitemap.*\.(xml|xsl)") {
            set $skip_cache 1;
        }

        if ($http_cookie ~* "comment_author|wordpress_[a-f0-9]+wp-postpass|wordpress_no_cache|wordpress_logged_in") {
            set $skip_cache 1;
        }

        location / {
            proxy_cache_bypass $skip_cache;
            proxy_no_cache $skip_cache;

            proxy_hide_header X-Frame-Options;
            proxy_pass http://192.168.0.100;
        }

         location /pruge/ {
            set $my_cache_key $scheme$host;
            content_by_lua_block {
                local exitStatus = os.execute("/usr/local/bin/nginx-cache-purge /var/run/proxy_cache 1:2 "..ngx.var.my_cache_key..string.sub(ngx.var.request_uri, 7))

                if exitStatus == 0 then
                    ngx.exit(ngx.HTTP_OK)
                else
                    ngx.exit(ngx.HTTP_BAD_REQUEST)
                end
            }
         }
    }
}
|
驗證 Nginx Config
驗證 Nginx Config 是否正確,參數用法可能會有所改變,需要再三確認
如果沒錯則可以讀取新的 Config
1
2
3
4
|
# Check Nginx Config
$ nginx -t
# Reload Nginx Config
$ systemctl reload nginx
|
安裝 Wordpress 插件
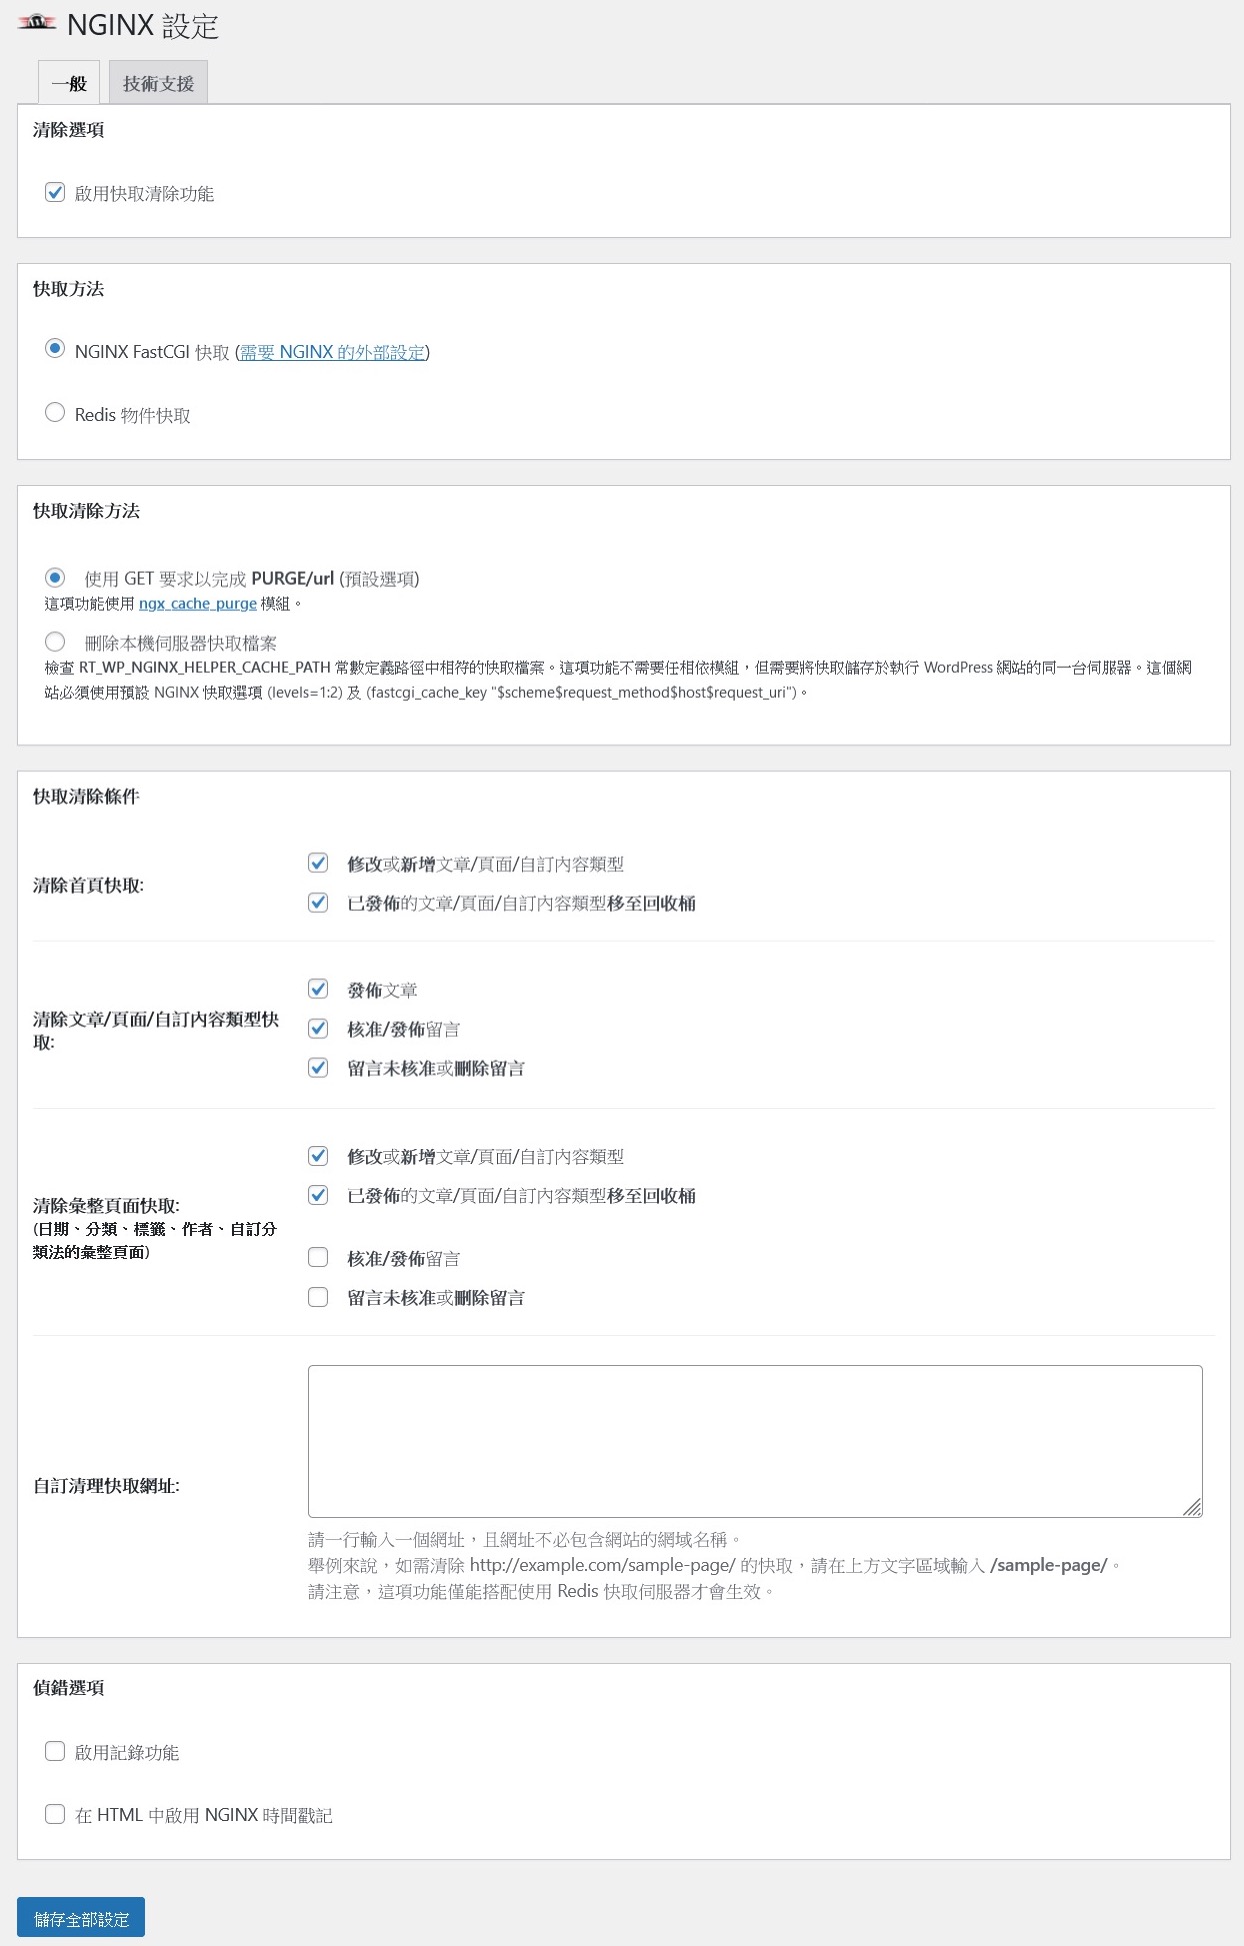
設定好清除入口後,需要讓 Wordpress 可以在文章新增、更新文章時可以主動清除
安裝 Nginx Helper 由 rtCamp 開發
設定

驗證
是否產生緩存
瀏覽各種頁面後,確認是否有產生緩存
1
2
|
$ cd /var/run/proxy_cache
$ ls -al
|
更新文章
產生新的文章後,Nginx Helper 是否會刪除緩存
如果看到文章列表有正常顯示,則表示緩存有正常刪除,若文章列表看不到新文章,則表示緩存未刪除,會看到舊文章
Ref
- Nginx - Module ngx_http_proxy_module # proxy_cache_path
- Magic Len - 如何清除Nginx的反向代理快取和FastCGI快取?
- 简书 - Debian/Ubuntu 下 Nginx+Lua 环境搭建
- Github - magiclen/nginx-cache-purge
- wordpress - Nginx Helper
